Solar Sensor Setup
From Weather-Watch Wiki
Solar Sensor Setup

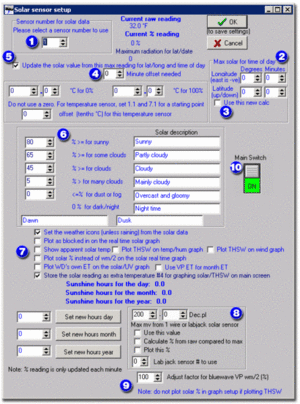
- Select the sensor number your weather station uses for solar readings.
- Make sure you enter your latitude and longitude correctly here. Latitude is the up or down from the equator and anything in the Southern hemisphere is negative. Logitude is east or west of the Greenwich merian and negative is east of Greenwich.
- Select the Use this new calc check box.
- Make sure the Minute offset needed is always zero. You should never ever need to change this value.
- Select the Update solar value from this max reading for lat/long and time of day check box.
- The boxes for solar description and the percentage thresholds should be left as default at this time. After you have your initial readings, you can return to this dialog box and make necessary adjustments.
- There are two check boxes that should be selected — Set the weather icons (unless raining) from the solar data and Store the solar reading as extra temperature #4 for graphing solar/THSW on main screen.
- The last box is used to setup a 1-wire solar sensor or LabJack and should not be modified if you are using a VP sensor. This box will appear if you add any 1-wire instrument to your setup, whether or not it is a solar sensor.
- At the bottom of the dialog box, leave the Adjust factor for bluewave VP wm/2 (%) at 100% if you have an original Davis solar sensor. You should not need to change the value unless you are using a sensor from another vendor, your sensor has been modified, or your sensor has drifted out of calibration. You should only compare values at or close to solar Noon for your location on a very clear and sunny day.
- Make sure you click on the Main Switch so that it is in the green ON position.
- Click OK to save your settings and close the dialog box.
