Creating a Weather WML Page: Difference between revisions
No edit summary |
|||
| Line 16: | Line 16: | ||
# Click '''OK''' to save settings and return to the main Weather Display window. | # Click '''OK''' to save settings and return to the main Weather Display window. | ||
===Custom WML file === | === Custom WML file === | ||
Make sure the default .wml file is being created | Make sure the default .wml file is being created. | ||
Use the index.wml file as a starter | # Return to the WAP screen as described above. | ||
# Select the ''Use my own Custom WAP file''' check box. | |||
# Use the '''index.wml''' file, located in the folder '''webfiles''', as a starter. Rename the file '''waplocal.txt'''. | |||
'''Note''' Make sure you do not accidentlaly reaname the file as '''waplocal.txt.txt'''. | |||
Replace actual weather conditions numbers with a custom tag. If you | At the scheduled times, this file will be read and a new '''index.wml''' created using that format as a guide. | ||
Replace actual weather conditions numbers with a custom tag. If you want to add other information, add an appropriate label and its custom tag. (<nowiki>"indoor temperature: %indoorhum%</nowiki>). | |||
More information about using custom tags can be found on the [[Using Custom Tags]] page. | More information about using custom tags can be found on the [[Using Custom Tags]] page. | ||
Revision as of 04:25, 22 January 2006
Purpose Create a WML Web pages for use on a public Webs site and to transmit the pages to the WML server.
Enabling WAP files
- On the main window in Weather Display, click Control Panel.
- Click FTP & Connections METAR/NOAA FTP.
- Click WAP tab.
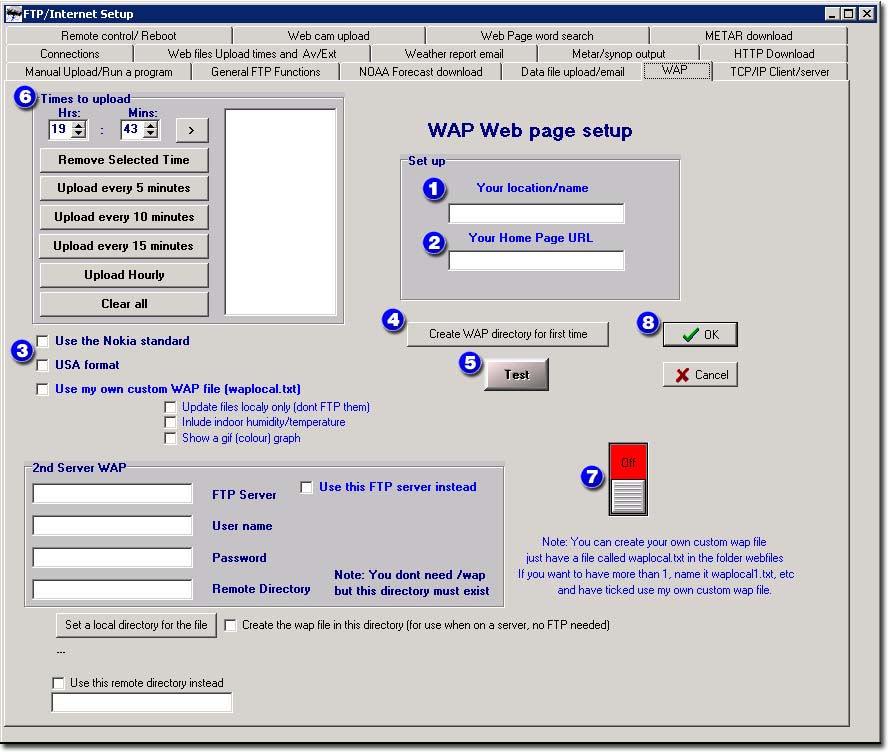

- Under Set up, type your weather station location name. For example, type Anywhere Weather.
- Type your home page Web address. For example, type http://www.example.com.
- Select the Nokia and/or USA format check boxes.
Make sure the Use my own custom WAP file check box is not selected. - Click Create WAP directory for first time.
- Click Test and then verify the WAP file (index.wml) is created in the webfiles folders.
- Enter a schedule for WAP uploads.
- Click on the red Off button so that it becomes green and the label changes to On.
- Click OK to save settings and return to the main Weather Display window.
Custom WML file
Make sure the default .wml file is being created.
- Return to the WAP screen as described above.
- Select the Use my own Custom WAP file' check box.
- Use the index.wml file, located in the folder webfiles, as a starter. Rename the file waplocal.txt.
Note Make sure you do not accidentlaly reaname the file as waplocal.txt.txt.
At the scheduled times, this file will be read and a new index.wml created using that format as a guide.
Replace actual weather conditions numbers with a custom tag. If you want to add other information, add an appropriate label and its custom tag. ("indoor temperature: %indoorhum%).
More information about using custom tags can be found on the Using Custom Tags page.
A simple WAP page might look like the following:
<?xml version='1.0'?>
<!DOCTYPE wml PUBLIC '-//WAPFORUM//DTD WML 1.1//EN' 'http://www.weather-display.de/DTD/wml_1.1.xml'>
<wml>
<head>
</head>
<card id="Weather-Display" title="Weather-Display">
<p>
CURRENT WEATHER REPORT FROM: LaddRd<br/>
6:23:57 PM 12/25/2002<br/>
Temperature: %temp%<br/>
Windspeed: %avgspd%<br/>
Gustspeed: %gstspd%<br/>
Direction: %dirlabel% %dirdeg%<br/>
Barometer: %baro%<br/>
Humidity: %hum% percent<br/>
Dew point: %dew%<br/>
Today's rain: %dayrn%<br/>
Maximum temperature: %maxtemp% at %maxtempt%<br/>
Minimum temperature: %mintemp% at %mintempt%<br/>
Maximum gust today: %maxgst% at %maxgstt%<br/>
%time% %date%<br/>
<a href="http://personalpages.tdstelme.net/~flaplant/weather/wx.html">Home</a> <br/>
<a href="http://www.weather-display.com/wap/index.wml">Created by Weather-Display</a>
</p>
</card>
</wml>
The <br/> is optional and intended to force each entry onto a new line.