Creating a Weather WML Page: Difference between revisions
No edit summary |
(Added categories and Note about relevance of the WAP/WML technology.) |
||
| (4 intermediate revisions by one other user not shown) | |||
| Line 1: | Line 1: | ||
Wireless Application Protocol (WAP) provides a way for delivering Web-like pages on mobile devices. WML is the language used to create pages to be displayed in a WAP browser. | |||
'''Note:''' WML and WAP are old technologies dating back to the early 2000's and as such they are much less relevant in today's Internet where phones can be connected to servers at hundreds of megabits per second. The technologies may be useful in areas where access to weather data is needed but phone connectivity isn't good or is very expensive. | |||
== Turn on WAP file creation == | |||
# On the main window in Weather Display, click '''Control Panel'''. | |||
# Click '''FTP & Connections METAR/NOAA FTP'''. | |||
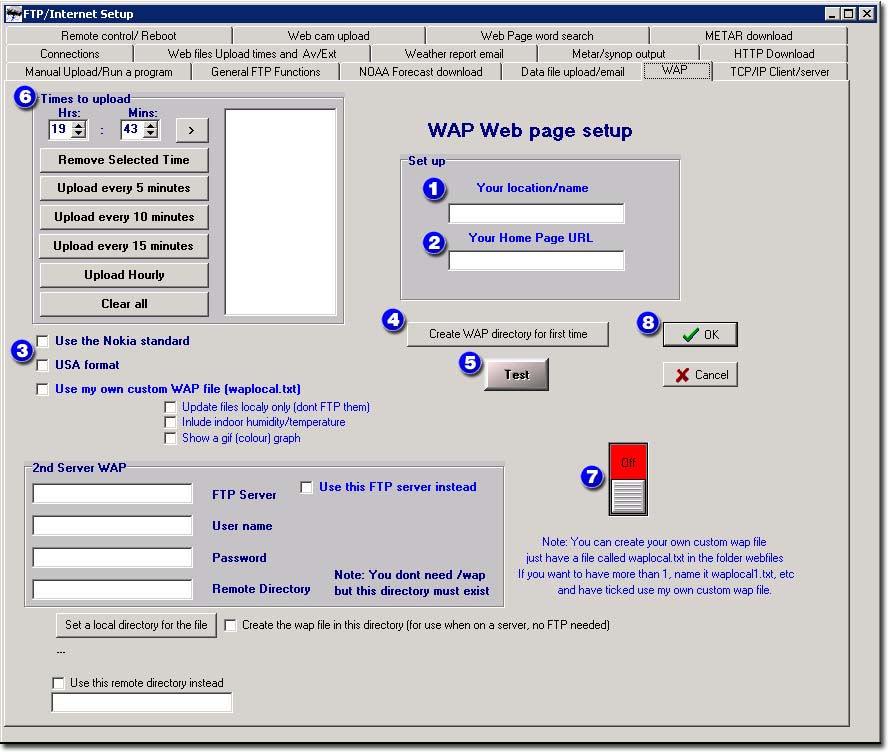
# Click '''WAP''' tab.<br>[[Image:WAPCallouts.jpg]] | |||
# Under '''Set up''', type your weather station location name. For example, type '''Anywhere Weather'''. | |||
# Type your home page Web address. For example, type '''<nowiki>http://www.example.com</nowiki>'''. | |||
# Select the '''Nokia''' and/or '''USA''' format check boxes.<br>Make sure the '''Use my own custom WAP file''' check box is not selected. | |||
# Click '''Create WAP directory for first time'''. | |||
# Click '''Test''' and then verify the WAP file (index.wml) is created in the webfiles folders. | |||
# Enter a schedule for WAP uploads. | |||
# Click on the red '''Off''' button so that it becomes green and the label changes to '''On'''. | |||
# Click '''OK''' to save settings and return to the main Weather Display window. | |||
== Create custom WML files == | |||
Make sure the default .wml file is being created. | |||
# Return to the WAP screen as described above. | |||
# Select the ''Use my own Custom WAP file''' check box. | |||
# Use the '''index.wml''' file, located in the folder '''webfiles''', as a starter. Rename the file '''waplocal.txt'''. | |||
'''Note''' Make sure you do not accidentlaly reaname the file as '''waplocal.txt.txt'''. | |||
At the scheduled times, this file will be read and a new '''index.wml''' created using that format as a guide. | |||
Replace actual weather conditions numbers with a custom tag. If you want to add other information, add an appropriate label and its custom tag. (<nowiki>"indoor temperature: %indoorhum%</nowiki>). | |||
More information about using custom tags can be found on the [[Using Custom Tags]] page. | |||
A simple WAP page might look like the following: | |||
<nowiki><?xml version='1.0'?></nowiki><br> | |||
<nowiki><!DOCTYPE wml PUBLIC '-//WAPFORUM//DTD WML 1.1//EN' 'http://www.weather-display.de/DTD/wml_1.1.xml'></nowiki><br> | |||
<nowiki><wml></nowiki><br> | |||
<nowiki><head></nowiki><br> | |||
<?xml version='1.0'?> | <nowiki></head></nowiki><br> | ||
<!DOCTYPE wml PUBLIC '-//WAPFORUM//DTD WML 1.1//EN' 'http://www.weather-display.de/DTD/wml_1.1.xml'> | <nowiki><card id="Weather-Display" title="Weather-Display"></nowiki><br> | ||
<wml> | <nowiki><p></nowiki><br> | ||
<head> | <nowiki>CURRENT WEATHER REPORT FROM: LaddRd<br/></nowiki><br> | ||
</head> | <nowiki>6:23:57 PM 12/25/2002<br/></nowiki><br> | ||
<card id="Weather-Display" title="Weather-Display"> | <nowiki>Temperature: %temp%<br/></nowiki><br> | ||
<p> | <nowiki>Windspeed: %avgspd%<br/></nowiki><br> | ||
CURRENT WEATHER REPORT FROM: LaddRd<br/> | <nowiki>Gustspeed: %gstspd%<br/></nowiki><br> | ||
6:23:57 PM 12/25/2002<br/> | <nowiki>Direction: %dirlabel% %dirdeg%<br/></nowiki><br> | ||
Temperature: %temp%<br/> | <nowiki>Barometer: %baro%<br/></nowiki><br> | ||
Windspeed: %avgspd%<br/> | <nowiki>Humidity: %hum% percent<br/></nowiki><br> | ||
Gustspeed: %gstspd%<br/> | <nowiki>Dew point: %dew%<br/></nowiki><br> | ||
Direction: %dirlabel% %dirdeg%<br/> | <nowiki>Today's rain: %dayrn%<br/></nowiki><br> | ||
Barometer: %baro%<br/> | <nowiki>Maximum temperature: %maxtemp% at %maxtempt%<br/></nowiki><br> | ||
Humidity: %hum% percent<br/> | <nowiki>Minimum temperature: %mintemp% at %mintempt%<br/></nowiki><br> | ||
Dew point: %dew%<br/> | <nowiki>Maximum gust today: %maxgst% at %maxgstt%<br/></nowiki><br> | ||
<nowiki>%time% %date%<br/></nowiki><br> | |||
Maximum temperature: %maxtemp% at %maxtempt%<br/> | <nowiki><a href="http://personalpages.tdstelme.net/~flaplant/weather/wx.html">Home</a> <br/></nowiki><br> | ||
Minimum temperature: %mintemp% at %mintempt%<br/> | <nowiki><a href="http://www.weather-display.com/wap/index.wml">Created by Weather-Display</a></nowiki><br> | ||
Maximum gust today: %maxgst% at %maxgstt%<br/> | <nowiki></p></nowiki><br> | ||
%time% | <nowiki></card></nowiki><br> | ||
<a href="http://personalpages.tdstelme.net/~flaplant/weather/wx.html">Home</a> <br/> | <nowiki></wml></nowiki><br> | ||
<a href="http://www.weather-display.com/wap/index.wml">Created by Weather-Display</a> | The '''<nowiki><br/></nowiki>''' is optional and intended to force each entry onto a new line. | ||
</p> | [[Category:Weather Display]] | ||
</card> | [[Category:Configuration]] | ||
</wml> | [[Category:Connectivity]] | ||
[[Category:Tags]] | |||
The | |||
Latest revision as of 21:03, 7 May 2022
Wireless Application Protocol (WAP) provides a way for delivering Web-like pages on mobile devices. WML is the language used to create pages to be displayed in a WAP browser.
Note: WML and WAP are old technologies dating back to the early 2000's and as such they are much less relevant in today's Internet where phones can be connected to servers at hundreds of megabits per second. The technologies may be useful in areas where access to weather data is needed but phone connectivity isn't good or is very expensive.
Turn on WAP file creation
- On the main window in Weather Display, click Control Panel.
- Click FTP & Connections METAR/NOAA FTP.
- Click WAP tab.

- Under Set up, type your weather station location name. For example, type Anywhere Weather.
- Type your home page Web address. For example, type http://www.example.com.
- Select the Nokia and/or USA format check boxes.
Make sure the Use my own custom WAP file check box is not selected. - Click Create WAP directory for first time.
- Click Test and then verify the WAP file (index.wml) is created in the webfiles folders.
- Enter a schedule for WAP uploads.
- Click on the red Off button so that it becomes green and the label changes to On.
- Click OK to save settings and return to the main Weather Display window.
Create custom WML files
Make sure the default .wml file is being created.
- Return to the WAP screen as described above.
- Select the Use my own Custom WAP file' check box.
- Use the index.wml file, located in the folder webfiles, as a starter. Rename the file waplocal.txt.
Note Make sure you do not accidentlaly reaname the file as waplocal.txt.txt.
At the scheduled times, this file will be read and a new index.wml created using that format as a guide.
Replace actual weather conditions numbers with a custom tag. If you want to add other information, add an appropriate label and its custom tag. ("indoor temperature: %indoorhum%).
More information about using custom tags can be found on the Using Custom Tags page.
A simple WAP page might look like the following:
<?xml version='1.0'?>
<!DOCTYPE wml PUBLIC '-//WAPFORUM//DTD WML 1.1//EN' 'http://www.weather-display.de/DTD/wml_1.1.xml'>
<wml>
<head>
</head>
<card id="Weather-Display" title="Weather-Display">
<p>
CURRENT WEATHER REPORT FROM: LaddRd<br/>
6:23:57 PM 12/25/2002<br/>
Temperature: %temp%<br/>
Windspeed: %avgspd%<br/>
Gustspeed: %gstspd%<br/>
Direction: %dirlabel% %dirdeg%<br/>
Barometer: %baro%<br/>
Humidity: %hum% percent<br/>
Dew point: %dew%<br/>
Today's rain: %dayrn%<br/>
Maximum temperature: %maxtemp% at %maxtempt%<br/>
Minimum temperature: %mintemp% at %mintempt%<br/>
Maximum gust today: %maxgst% at %maxgstt%<br/>
%time% %date%<br/>
<a href="http://personalpages.tdstelme.net/~flaplant/weather/wx.html">Home</a> <br/>
<a href="http://www.weather-display.com/wap/index.wml">Created by Weather-Display</a>
</p>
</card>
</wml>
The <br/> is optional and intended to force each entry onto a new line.
