Setting up to use TAPR: Difference between revisions
From WeatherWiki
m (Removed number from last item which is not a step, but a conclusion statement.) |
m (Added categories) |
||
| Line 5: | Line 5: | ||
* X1W-4 | * X1W-4 | ||
* T-238+MODEM2 | * T-238+MODEM2 | ||
These kits provide temperature, humidity, barometer, radiation, lightning, and rain sensors or interfaces through the Dallas 1-wire system. | |||
These kits provide | |||
'''Programming X1W-1 Barometer''' | '''Programming X1W-1 Barometer''' | ||
# On the main Weather Display window, click '''Control Panel'''. | # On the main Weather Display window, click '''Control Panel'''. | ||
# Under '''Station Settings''', click '''Dallas 1 Wire'''. | # Under '''Station Settings''', click '''Dallas 1 Wire'''. | ||
| Line 25: | Line 23: | ||
# Click '''Close'''. | # Click '''Close'''. | ||
After approximately five minutes, barometer sensor readings are captured. | After approximately five minutes, barometer sensor readings are captured. | ||
[[Category:Weather Display]] | |||
[[Category:Configuration]] | |||
[[Category:1-Wire]] | |||
Latest revision as of 14:20, 8 May 2022
TAPR (Tucson Amateur Packet Radio) provides a variety 1-wire weather sensor kits, including the following:
- X1W-1
- X1W-4
- X1W-4
- T-238+MODEM2
These kits provide temperature, humidity, barometer, radiation, lightning, and rain sensors or interfaces through the Dallas 1-wire system.
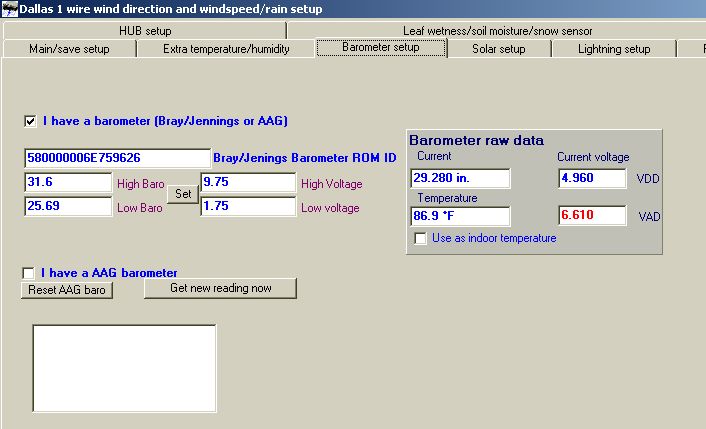
Programming X1W-1 Barometer
- On the main Weather Display window, click Control Panel.
- Under Station Settings, click Dallas 1 Wire.
- On the Main/Save Setup tab, in the Current Direction Chip ROM ID # box, select and then copy (press CTRL+C) the number to the clipboard.
- Select the I have a barometer (Bray-Jennings or AAG) check box.
- On the Barometer setup tab, in the Bray/Jennings Barometer ROM ID" box, paste (CTRL+V) the number you copied to the clipboard in step 3.
- Enter values for the High Baro, Low Baro, High Voltage, Low Voltage as follows:
- Click Set.
- On the Main/Save Setup tab, click Save/reset.
- Click Close.
After approximately five minutes, barometer sensor readings are captured.

