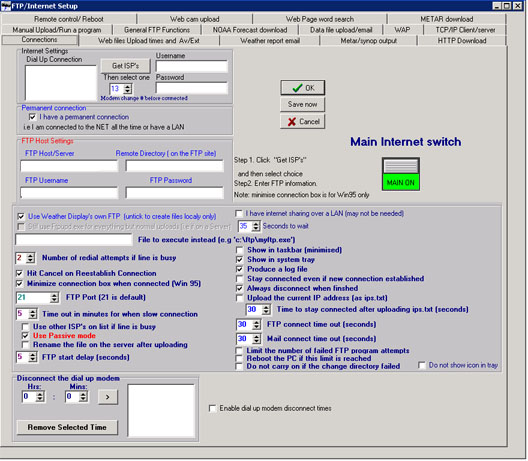
Connecting to Internet
From Weather-Watch Wiki
Connecting to Internet
Getting Started
- On the main Weather Display window, click Control Panel.
- Under Web Site Configurations, click FTP Connections METAR/NOAA FTP.
- Click the Connections tab.

Dial-up networking to your Internet ISP
This is the more normal case when the WD machine gets its Internet access from a modem directly connected to it.
- Under Internet Settings, click Get ISP's.
- Select the ISP you want to connect to (there most likely will only be one) from the list.
- The Username and Password text boxes should auto-complete with your information. If you configured dial-up networking without the password saved, you will be prompted to enter your password. This is the same password as you would normally enter when you connect to the Internet.
- Continue with the All Setups section below.
Persistent (always on) connection to the Internet
This is if you are using ISDN, DSL, or cable modem broadband Internet service. It also applies to those with dial-up modems which are connected at all times to your ISP.
- Under Permanent Connections, select the I have a permanent connection check box.
- Continue with the All Setups section below.
Note Do not select the I have Internet sharing over a LAN check box.
All Setups
- For future debugging, select Produce a log file. If you want to view the last log file produced, on the main Weather Display window, click View, and then under Logs, click FTP Log. All of the current day's FTP Internet connections will be displayed, with the most recent entries are at the end of the log.
- Select the Hit Cancel on reestablish connection is suggested.
- Minimize connection box when connected (Win 95) applies only if you are using Microsoft Windows 95.
- You should not change the FTP Port from the default of 21, unless specified by your ISP.
- If your FTP connection is very slow, the specified number in Time out in minutes for when a slow connection denotes the number of minutes before Weather Display will stop the FTP attempt. 5 minutes should be adequate.
- Do not select the Use other ISP's on list if line is busy check box unless you have configured more than one ISP/FTP server.
- For some configurations, the normal FTP mode will work, but if you are using a hardware or software firewall you might encounter problems. If a connection appears to hang and you have a firewall, try selecting the Use Passive Mode check box. You might also have to make changes to the firewall to let Weather Display access the Internet. You should consult the documentation for your firewall for instructions on how to allow a program to access the Internet.
- Rename the file on the server after uploading is not supported by some FTP servers, including many Windows-based servers. Do not select this check box unless you know your FTP server supports this functionality.
- Click the Main Internet Switch to toggle between MAIN OFF and MAIN ON. You must use MAIN ON to enable the FTP functionality of Weather Display.
- Click OK.
Weather Display is now configured to use the Internet, but does not generate any Internet activity by itself.
Notes
- If you don’t want Weather Display to run its own FTP program, for example, because you are using a Weather display on a local server, then clear the Use Weather Display's own FTP check box, and you can enter in the File to execute instead text box a .bat file for Weather Display to execute to copy the files to the destination location. You can select the location of where to produce the files under the Tab Files, and then click Set Web files location.
- If you want Weather Display to perform other functions, such as send data to Wunderground or download METARs, etc., then select the Still use ftpupd.exe for everything but normal uploads check box. This check box is enabled only when you clear the Use Weather Display's own FTP check box.
- If you want Weather Display to update a Web page on the Internet, for example, your Web home page, then you must set up the FTP Host/Server, FTP Username, and FTP Password, using the server information and credentials provided by your Internet service provider (ISP). If you leave the Remote Directory text box blank, then the files are uploaded to your account's default folder on the FTP server. The Remote Directory can be the most tricky part to get correct, as you need to get the placement of any needed "/" exactly correct. Your ISP should be able to assist you if you encounter problems.
